Tuesday, August 26, 2008

Wall Dressed Up Enters StartupNation Home-Based 100 Competition


We just entered The StartupNation Home-Based 100 Competition and would love your vote! StartupNation is a great site by entrepreneurs, for entrepreneurs and is a huge source of information for startup businesses. Below is a summary of our entry. We entered in 2 categories-Boomers Back in Business, and Most Innovative!

We would of course love the exposure that being a winner of this competition would give Wall Dressed Up. What a great way to let more people know about this fabulous new decorating product. We would really appreciate your vote! Help spread the word about these wonderful mural transfers! Thanks!


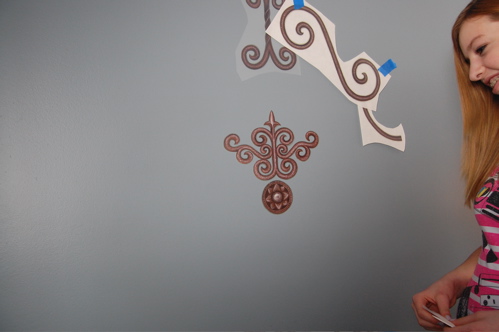
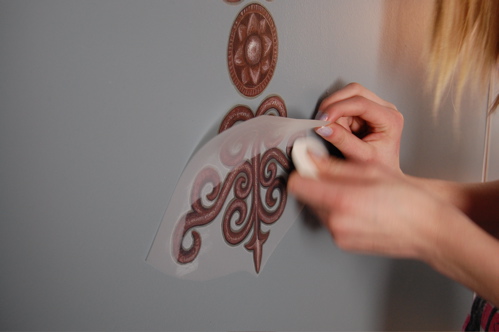
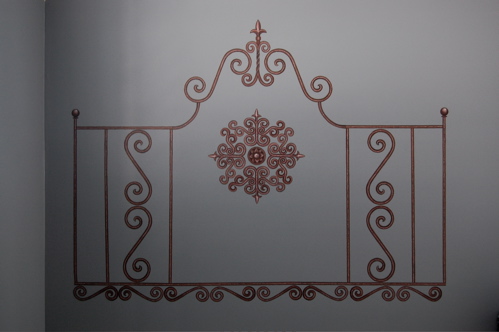
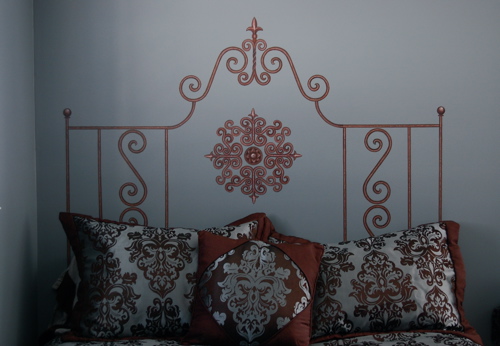
Wall Dressed Up manufactures and sells mural transfers that you simply rub onto your wall!

We started Wall Dressed Up last fall after several years of research to find just the right mural transfer product for our business. We are two artists/moms coming back into the business world with a mural product that easily rubs onto your wall, almost like a tattoo!

These transfer murals simply becomes part of your wall, just like a thin coat of paint. This is not a sticker! Every original brush stroke and shadow is reproduced in high resolution detail and shadows make the artwork pop! All you need to do is rub it on the wall! You can now beautifully decorate flat or textured walls, floors, ceilings, furniture, mirrors and more without even a single drop of paint!

We are thrilled to be starting this business and taking advantage of new technology to promote and sell our affordable murals. We feel this is a great and inexpensive way to add mural artwork to as many walls as possible. We have our website, blog and are also selling our murals on Amazon. We have a few boutique stores who carry our murals and are busy building the business.

We would like to be considered for the startupnation Home-Based 100 Competition as we have gone from a kernel of an idea to the start of a thriving online business. We opened less than a year ago, in October of 2007. We are 2 artist/moms, living in different states, who searched for 2 years for this thin-as-paint transfer printing. The printing technology itself is amazing.

It was a childhood memory of a rub down transfer coloring book that sparked our first thought of combining printed transfers with our mural art.

We learned how to build a website ourselves, get our product manufactured, and came up with the start up funds to open and market our business. We used many resources and ideas here on the startupnation website (it's a great source of ideas and information) as we progressed along the many steps of starting a business.

Thanks for considering Wall Dressed Up for the Home-Based 100 Competition!

Monday, August 25, 2008

Create A Colorblend

ColorBlender is a web-based tool for creating color palettes (here referred to as "blends") for web design and other types of digital design.

The main feature of the tool is to have a complete "blend" of 6 matching colors created when choosing only one "base" color. This makes it very quick and easy to create a color scheme for e.g. a website, as you can instantly use the colors for text, backgrounds, links, border etc.

This is one of the easiest ways to come up with a color scheme for online use and it's even easy to upload the colors into photoshop and the like. When you are satisfied with your "blend" you can save it so you can access it later.

Clicking the "Photoshop Color Table (.ACT)" button will let you download the blend as a small file that can be imported into Adobe Photoshop (see the FAQ for more info).

"Send blend by email" will give you a single URL to open your current blend directly. This let you "bookmark" the blend in your web browser or even send the blend via email. In this way, the recipient can view your blend, and eventually fine tune it, export it, etc.

In Adobe Photoshop, open the Swatches palette. In the upper right corner menu of the palette, choose either "Replace Swatches..." or "Load Swatches...". From the file dialog, be sure to select the "Color Table (*.ACT)" file type, then locate the *.ACT file you just saved. Click "Load". The colors of the blend will now be loaded into the Swatches palette, ready for use in Photoshop!

Try it, it's completely free, though you can certainly make a donation.

Saturday, June 28, 2008

Visualize Your Completed Redecorating Project Before You Start!

With the summer heat upon us, we're spending some time indoors, where the air conditioning keeps things nice and cool. However, some things inside your house may be calling out for a change! You may be contemplating doing some redecoration...but where to begin?

Maybe you don't like the floors. Or, maybe you want to shake things up by moving your furniture. However, before you get started with projects like this, you probably want to do a little planning. Otherwise, you could end up with a mess on your hands or a decorating mistake.

PlanningWiz has a free tool that will help. You simply begin by entering the dimensions of your room. Then you can begin to add existing structural elements like doors, arches and windows. Now you're ready to have some fun!

You can add new structural elements to your room—if you're planning on doing some heavy-duty remodeling. You can also change the floor covering. Then add furniture to see how things will look. Once you're done, save or e-mail your plan for future reference.

Thursday, May 29, 2008

How to Paint Professional Looking Words on Your Walls


Paint Professional Looking Words on Your Walls
Rate: (2 Ratings)

You don't have to be an artist to paint a sentiment, a quote, or child's name on the wall. Just follow these directions and you can get a very professional looking result, adding a personal touch to any room in your home.

Difficulty: Moderately Easy

Things You’ll Need:

  • Computer w/ Word Processing program
  • Printer
  • Use of a Copy Machine
  • Transfer Paper (like carbon paper but not as smudgy, available at art or craft stores)
  • Blue Painters Tape
  • chalk, pencil
  • ballpoint pen
  • Yard stick
  • Level
  • Acrylic paint in bottles
  • Small Lettering Brush

Step1
Decide what you would like to paint on your wall. If you need inspiration, Google "famous quotes".
It can be interesting to use a quote in another language. Google "free translation" to translate what you would like to paint. Another idea is to paint your child's name in their bedroom, they will love it!
Step2
Paint or faux finish wall where you plan to paint words in desired color
Step3
Type your quote on computer, experimenting with fonts until you find one that you like. Make the font as large as you can. Print a copy. If not large enough, take to a copy store and enlarge to the size you need. It doesn't matter if it is on several sheets of paper, you can tape them together if necessary.
Step4
Using a level and yardstick and tiny pencil or chalk marks on the wall to make sure the lines of your letters are straight, tape sheet of copied words to wall using tape only at top. Now slide transfer paper (make sure you have the transferring side of the paper facing the wall) underneath the sheet of copied words, and tape with small pieces of tape to secure.
With a pencil or ballpoint pen, trace letters on copied sheet. When you are done you should have the words on your wall.
Step5
Outline with a small brush, paint them in.

Tuesday, May 13, 2008

Create A Headboard Using Mural Transfers

You can create a headboard like this in any size (twin, full, queen, king, ca king) using a Wall Dressed Up Wrought Iron Mural Transfer. This is a fun project and you can create a headboard like this using our wrought iron elements! This headboard was created using only one wrought iron order for $68 (we even had leftovers)! This is a fraction of the cost of a “real” wrought iron headboard. It’s a great value and a really fun project.

14 year old Lindsay had redecorated her room in beautiful shades of steel blue and brown. All that was missing was a headboard! We will show you pictures from start to finish of her headboard project. This entire project took about 2 hours from start to finish. Lindsay’s beautiful bed looks complete now that she has a “headboard”!

This is Lindsay! Here she is measuring the length that she wants her headboard to be!

She cut the wrought iron pieces apart, leaving the backing paper on and did a rough layout of the design she wanted for her headboard.

Lindsay measured to make sure the medallion was centered and would be above the her decorative bed pillows and marked center with a light pencil mark. She taped up a few pieces to get the height correct and then started rubbing the medallion onto the wall!

This shows Lindsay rubbing the mural transfer off the transfer paper onto her wall. Only the thin as paint artwork transfers, making your mural look hand painted!

Here she has a little help continuing to rub the elements on the wall. Light pencil marks and the use of a level make sure that the design goes up straight and even!

Another picture of the mural going up!

The finishing touches….

Here is the finished project!

Sunday, April 06, 2008

Mr. Picasso Head

Oh...this is like Mr. Potato Head in a fun on a drag and drop interface that uses Picasso like elements to create a face. Drag drop, make larger, color and just have a few minutes of creativity! Mr Picasso Head is retro fun for anyone, but especially for arty types like me! You can even sign and email your creations. Here is a link to one of my creations :-) Just a little diversion in your day.

Friday, March 28, 2008

Interior Decoration: What's Your Color?

Interior Decoration: What's Your Color?

Related Posts Plugin for WordPress, Blogger...

Quick Linker